LaTeX/Teme
Novi korisnici LaTeX-a se osećaju razočarano zbog nedostatka vizuelnog prilagođavanja koje nudi sistem. Zapravo to je učinjeno namerno: LaTeX filozofija ima pravo na pravo formatiranje dok je pisac fokusiran na sadržaj.
U ovom poglavlju ćemo pokazati šta možemo postići sa nekim naporima.
Uvod
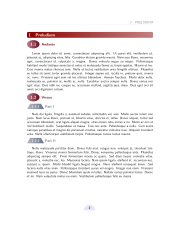
[uredi]U nastavku ćemo napisati temu, paket koji će samo promeniti izgled dokumenta, tako da će naš dokument raditi sa ili bez teme.
Imajte na umu da ako može izgledati dopadljivo, to apsolutno nije model tipografije. Ne treba koristiti takvu temu za ozbiljne publikacije. Ovo je više tehnološki primer pokazuju LaTeX sposobnosti.
-
Custom theme (TOC)
-
Custom theme
-
Custom theme (red)
Konfiguracija paketa
[uredi]Ovde se ništa posebno ne može reći. Ovo je direktna primena poglavlja Kreiranja paketa.
Učitaćemo sledeće pakete.
- needspace se koristi da spreči praznu stranu odmah posle komande koja pravi odeljke.
- tikz se koristi za crtanje materijala.
Definišemo opciju boje i može se koristiti onoliko koliko želite. Definisanje boje sa specifičnim imenima čini se vrlo fleksibilno. Takođe koristimo opciju da isključi reflektujuće efekte kojih bi moglo biti malo previše !
\NeedsTeXFormat{LaTeX2e}
\ProvidesPackage{theme-fancy}[2013/01/13 v1.0 fancy theme]

%%%%%%%%%%%%%%%%%%%%%%%%%%%%%%%%%%%%%%%%%%%%%%%%%%%%%%%%%%%%%%%%%%%%%%%%%%%%%%%%
%% Packages

\RequirePackage{geometry}
\RequirePackage{needspace}
\RequirePackage[svgnames]{xcolor}

\RequirePackage{hyperref}
\hypersetup{colorlinks=true}

\RequirePackage{fancyhdr}

\RequirePackage{tikz}
\usetikzlibrary{
  calc,
  decorations.pathmorphing,
  fadings,
  shadows,
  shapes.geometric,
  shapes.misc,
}

%%%%%%%%%%%%%%%%%%%%%%%%%%%%%%%%%%%%%%%%%%%%%%%%%%%%%%%%%%%%%%%%%%%%%%%%%%%%%%%%
%% Options

%% Toggle reflection.
\newif\if@mirrors\@mirrorsfalse
\DeclareOption{mirrors}{
  \@mirrorstrue
}

%% Colors.
\newif\if@red\@redfalse
\DeclareOption{red}{
  \@redtrue
}

\ExecuteOptions{}
\ProcessOptions\relax

%%%%%%%%%%%%%%%%%%%%%%%%%%%%%%%%%%%%%%%%%%%%%%%%%%%%%%%%%%%%%%%%%%%%%%%%%%%%%%%%
%% Configuration

\renewcommand{\familydefault}{\sfdefault}
\setlength{\parskip}{0.5\baselineskip}

%% Colors
\colorlet{toctitle}{DarkGray!50!black}
\colorlet{titlebg}{MidnightBlue}
\colorlet{titlefg}{LightBlue}
\colorlet{titletxt}{MidnightBlue}
\colorlet{sectionfg}{MidnightBlue}
\colorlet{subsectionfg}{SteelBlue}
\colorlet{subsubsectionfg}{LightSteelBlue!60!black}

\if@red
\colorlet{toctitle}{DarkGray!50!black}
\colorlet{titlebg}{DarkRed}
\colorlet{titlefg}{FireBrick!50}
\colorlet{titletxt}{DarkRed}
\colorlet{sectionfg}{DarkRed}
\colorlet{subsectionfg}{Crimson!50!black}
\colorlet{subsubsectionfg}{LightSteelBlue!60!black}
\fi
|
Zaglavlje i podnožje
[uredi]Koristimo TikZ za crtanje ispunjenog polukruga.
fancyhdr se koristi za postavljanje zaglavlja i podnožja. Vodimo računa o korišćenju fancy stila i da počnemo od nule brisanjem prethodnog zaglavlja i podnožja sa \fancyhf{}.
%%%%%%%%%%%%%%%%%%%%%%%%%%%%%%%%%%%%%%%%%%%%%%%%%%%%%%%%%%%%%%%%%%%%%%%%%%%%%%%%
%% Header and Footer

\tikzstyle{foliostyle}=[fill=Lavender, text=MidnightBlue, inner sep=5pt, semicircle]

\pagestyle{fancy}
\fancyhf{}
\fancyfoot[C]{
  \vskip 3pt
  \begin{tikzpicture}
    \node[foliostyle]
    {\bfseries\thepage};
  \end{tikzpicture}
}

\renewcommand{\headrulewidth}{0.8pt}
\addtolength{\headheight}{\baselineskip}
\renewcommand{\headrule}{\color{LightGray}\hrule}
\fancyhead[LE]{ \textcolor{gray}{\slshape \rightmark} }
\fancyhead[RO]{ \textcolor{gray}{\slshape \leftmark} }
|
Sadržaj
[uredi]Redefinišemo komande koje koriste \tableofcontents.
%%%%%%%%%%%%%%%%%%%%%%%%%%%%%%%%%%%%%%%%%%%%%%%%%%%%%%%%%%%%%%%%%%%%%%%%%%%%%%%%
%% Table of contents

\newcommand{\sectiontoccolor}{sectionfg}
\newcommand{\subsectiontoccolor}{subsectionfg}
\newcommand{\subsubsectiontoccolor}{subsubsectionfg}

\renewcommand*\l@section{\color{\sectiontoccolor}\def\@linkcolor{\sectiontoccolor}\@dottedtocline{1}{1.5em}{2.3em}}
\renewcommand*\l@subsection{\color{\subsectiontoccolor}\def\@linkcolor{\subsectiontoccolor}\@dottedtocline{1}{2.3em}{3.1em}}
\renewcommand*\l@subsubsection{\color{\subsubsectiontoccolor}\def\@linkcolor{\subsubsectiontoccolor}\@dottedtocline{1}{3.1em}{3.9em}}
\def\contentsline#1#2#3#4{%
  \ifx\\#4\\%
  \csname l@#1\endcsname{#2}{#3}%
  \else
  \csname l@#1\endcsname{\hyper@linkstart{link}{#4}{#2}\hyper@linkend}{%
    \hyper@linkstart{link}{#4}{#3}\hyper@linkend
  }%
  \fi
}

%% New title format -- 'section' is used by default.
\newcommand{\tocformat}[1]{{\Huge\bf#1}}

\renewcommand\tableofcontents{%
  \tocformat{
    \textcolor{toctitle}{\contentsname}
    \@mkboth{\MakeUppercase\contentsname}{\MakeUppercase\contentsname}
  }%
  \@starttoc{toc}%
}
|
Odeljci
[uredi]Ovo je verovatno najkomplikovaniji deo. To nije tako teško, jer je kod gotovo isti za \section, \subsection i \subsubsection.
Koristimo \needspace da se uverimo da nema prestajanja reda odmah nakon komande stvaranja odeljaka. Mi prilogđavamo komandu u grupi gde smo postavili veličinu fonta, jer prostor koji nam treba je \baselineskip što zavisi od veličine fonta.
Zvezdaste komande neće postaviti brojače (LaTeX podrazumevano ponašanje). Možete izabrati drugačije rukovanje zvezdastom komandom vraćanjem brojača na primer.
Nastavljamo odeljak štampanje od strane \noindent.
Uveravamo se da je kraj štampanja odeljka sa \par komandom kojom se uveravamo da je sledeći tekst pravilno odštampan.
Za \subsection koristimo mirrors opciju koja menja izgled.
Da bi se pravilno rukovalo PDF markerima moramo pratiti sledeće redove na kraju definicija.
\phantomsection
\addcontentsline{toc}{section}{\thesection~#1}
|
Konačno, za \section samo želimo da odštampamo u zaglavlju, pa zovemo \sectionmark komandu. Ovde smo promenili ponašanje komande u odnosu na originalnu LaTeX verziju, pošto definišemo i koristimo \sectionmarkstar komandu.
%%%%%%%%%%%%%%%%%%%%%%%%%%%%%%%%%%%%%%%%%%%%%%%%%%%%%%%%%%%%%%%%%%%%%%%%%%%%%%%%
%% Section style

\renewcommand\section{
  \@ifstar
  \my@sectionstar
  \my@section
}

%% Note: to justify, text width must be set to \textwidth - 2*(inner sep).
\tikzstyle{sectionstyle}=[
  inner sep=5pt,
  text width=\textwidth-10pt,
  left color=sectionfg!100!white,
  right color=sectionfg!50!white,
  rounded corners,
  text=Ivory,
  rectangle
]

\newcommand\my@section[1]{
  \stepcounter{section}
  {\Large\needspace{\baselineskip}}
  \noindent
  \begin{tikzpicture}
    \node[sectionstyle] {\bfseries\Large\thesection\quad#1};
  \end{tikzpicture}
  \par
  \phantomsection
  \addcontentsline{toc}{section}{\thesection~#1}
  \sectionmark{#1}
}

\newcommand{\sectionmarkstar}[1]{\markboth{\MakeUppercase{#1}}{}}

\newcommand\my@sectionstar[1]{
  {\Large\needspace{\baselineskip}}
  \noindent
  \begin{tikzpicture}
    \node[sectionstyle] {\bfseries\Large#1};
  \end{tikzpicture}
  \par
  \phantomsection
  \addcontentsline{toc}{section}{#1}
  \sectionmarkstar{#1}
}


%%%%%%%%%%%%%%%%%%%%%%%%%%%%%%%%%%%%%%%%%%%%%%%%%%%%%%%%%%%%%%%%%%%%%%%%%%%%%%%%
%% Subsection style

\renewcommand\subsection{
  \@ifstar
  \my@subsectionstar
  \my@subsection
}

\tikzstyle{subsectionstyle}=[
  left color=subsectionfg!50!white,
  right color=subsectionfg!100!white,
  text=Ivory,
  ellipse,
  inner sep=5pt
]

\newcommand\my@subsection[1]{
  \stepcounter{subsection}
  {\Large\needspace{\baselineskip}}
  \noindent
  \begin{tikzpicture}
    \node[subsectionstyle,anchor=west] (number) at (0,0) {\bfseries\Large\thesubsection};
    \if@mirrors
    \node[above right,subsectionfg,anchor=south west] at ($(number.east)+(0.1,-0.1)$) {\large\bfseries#1};
    \node[yscale=-1, scope fading=south, opacity=0.4, above, anchor=south west, subsectionfg] at ($(number.east)+(0.1,0.1)$) {\large\bfseries#1};
    \else
    \node[above right,subsectionfg,anchor=west] at ($(number.east)+(0.1,0)$) {\large\bfseries#1};
    \fi
  \end{tikzpicture}
  \par
  \phantomsection
  \addcontentsline{toc}{subsection}{\thesubsection~#1}
}

\newcommand\my@subsectionstar[1]{
  {\Large\needspace{\baselineskip}}
  \noindent
  \begin{tikzpicture}
    \node[subsectionstyle,anchor=west] (number) at (0,0) {\bfseries\Large\phantom{1}};
    %
    \if@mirrors
    \node[above right,subsectionfg,anchor=south west] at ($(number.east)+(0.1,-0.1)$) {\large\bfseries#1};
    \node[yscale=-1, scope fading=south, opacity=0.4, above, anchor=south west, subsectionfg] at ($(number.east)+(0.1,0.1)$) {\large\bfseries#1};
    \else
    \node[above right,subsectionfg,anchor=west] at ($(number.east)+(0.1,0)$) {\large\bfseries#1};
    \fi
  \end{tikzpicture}
  \par
  \phantomsection
  \addcontentsline{toc}{subsection}{#1}
}

%%%%%%%%%%%%%%%%%%%%%%%%%%%%%%%%%%%%%%%%%%%%%%%%%%%%%%%%%%%%%%%%%%%%%%%%%%%%%%%%
%% Subsubsection style

\renewcommand\subsubsection{
  \@ifstar
  \my@subsubsectionstar
  \my@subsubsection
}

\tikzstyle{subsubsectionstyle}=[
  left color=subsubsectionfg!50!white,
  right color=subsubsectionfg!100!white,
  text=Ivory,
  shape=trapezium,
  inner sep=5pt
]

\newcommand\my@subsubsection[1]{
  \stepcounter{subsubsection}
  \noindent
  \begin{tikzpicture}
	\node[subsubsectionstyle] (number) {\bfseries\large\thesubsubsection};
	\node[subsubsectionfg, right of=number, anchor=west] {\large\bfseries#1};
  \end{tikzpicture}
  \par
  \phantomsection
  \addcontentsline{toc}{subsubsection}{\thesubsubsection~#1}
}

\newcommand\my@subsubsectionstar[1]{
  \noindent
  \begin{tikzpicture}
	\node[subsubsectionstyle] (number) {\bfseries\large\vphantom{1}};
	\node[subsubsectionfg, right of=number, anchor=west] {\large\bfseries#1};
  \end{tikzpicture}
  \par
  \phantomsection
  \addcontentsline{toc}{subsubsection}{#1}
}

\endinput
|
Beleške i reference
[uredi]


